Wave Editing Notes
Charles Wolff
| Neologistics→ Music → Wave Editing |
I've been doing some audio transfers for Lynn Newton, and thought people might be interested in seeing a little bit of what goes on in the process of editing .wav files on a computer.
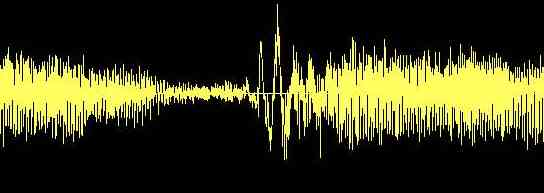
The image at the top of the page is about 3/4 of a second from a song called How Shall I Speak to You? The reason I was working on this part of the song is that there was a word which started with an `f' sound where Lynn blew into the microphone, making a big ``thud'' on the tape.
Can you guess where the big thud is? A little to the left of the center of the image, you'll see a very high peak. That's where the problem is!
The way these files work is this: the vertical dimension represents volume, and the horizontal dimension represents frequency. So in the sample above we can see that the volume started out moderately, faded to a fairly low level (between words), and then we get this big pop at the start of the next phrase.
However, the interesting thing is that if you look at that big pop, you can trace a relatively low frequency wave: up, down, way up, way down, and then fading back into the program material. Where most of the audio in this sample is going up and down so fast that it just looks like a bunch of parallel lines, on the pop, we can see the low frequency waveform superimposed on the song.

Here's a full-screen view of that same audio. The red and blue waves across the bottom are the whole song; the black area in the top part of the screen is the 1.237-second section of the whole song that matches the narrow black strip in the bottom whole-song display.
There are probably wave editor programs out there which would actually let you "draw" a low frequency wave on top of the program material and then "subtract" that wave from the program - essentially removing the ``thud'' by pulling out the offending low frequency information. The program I'm working with isn't that sophisticated — so what I ended up having to do was to go to another part of the song, where there was a similar `f' sound without a big pop — and copy and paste that sound over the offending section.
There are two places in How Shall I Speak to You? where I had to do that. The first one I think I nailed pretty well. In the second one, you can hear some static where the pastes occurred, but the big thud is gone.
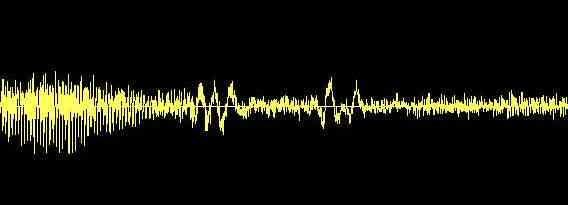
This is the second place in the song I had to fix, and you can see that it's a bit more complicated, as there are two places where there is an underlying thud. Again, I found a similar section and cut and pasted in a fix. One of the trickiest parts of cutting and pasting a fix like this is that if you paste a 136 microsecond fix over a 238 microsecond error, you just lost 1/10 of a second of your song. So you have to keep the cut and paste widths consistent. And, to avoid clicks and pops, you need to start and end your cut at points where the level is crossing the line, and then paste it back in in a place where the start and end of the paste match-up.
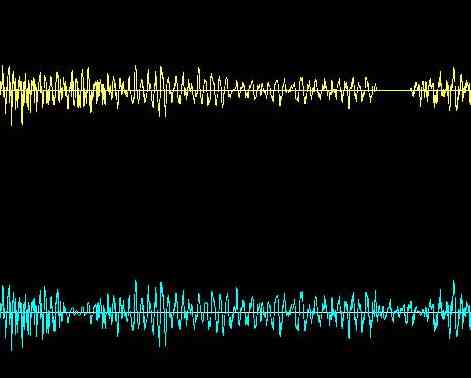
At the very end of the song, there were several ``tape dropouts.'' In this image, you can see one dropout in the right (bottom) channel about 1/3 of the way through, and a more serious one in the left (top) channel about 2/3 of the way through. The sample above represents about 1/4 second of audio, and you can start to see the waveforms a little better. (Keep in mind that a CD is recorded at 44100 samples per second, and that a typical musical note is around 500 cycles per second. So, if this is a 1/4 second sample, a typical musical note would still have 125 cycles in just the width of this screen.)
In this case, the fact that the mix I was working from was mono made it relatively easy to fix these two dropouts. I would select the area with the dropout (maybe twenty microseconds, but definitely audible), change the volume of the bad track to zero, copy both tracks, and then paste-mix the good track of the sample onto the bad track. If this had been a stereo mix, I probably couldn't have gotten away with that, and I would have had to find a sample somewhere else on the ``bad'' side, and pasted it over the dropout on that same side.
Note: if the mix was really mono, the two channels would be identical. I was working from a mono reel-to-reel mix-down tape, but there are obviously small variations through the whole song, when you get down to comparing wave-for-wave channel against channel...)
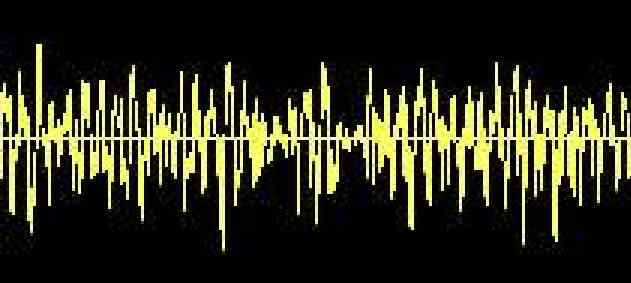
One final comment: The sample above (which suffers from having been expanded in the image editor) represents about 1/8 of a second of music. Remember how we could see the low frequency thud in the first example, superimposed on the program material? Well, ``tape hiss'' is kind of the opposite of a thud — it will be a very high frequency mostly random waveform superimposed on the program material. Where we might have been able to remove the low frequency "thud" on the earlier sample, to try to go through a waveform like this and remove the smaller waveforms superimposed on it becomes a much stickier problem. I didn't try to do any de-hissing on Lynn's tapes; there are some programs that use some interesting algorithms to try to remove hiss. (Sample some hiss from an otherwise quiet part of the tape, and then try to use that as the basis for determining whether each tiny blip is hiss or a cymbal.) Out of my price range at the moment.
Anyway ... hope this was of some interest. One of the best uses I've found for the wave editor so far is to take a mixed down song, remove everything before the start of the song and replace it with two seconds of silence; remove everything after the end of the song and put one second of silence, and then make sure that the program material actually fades off to silence in its last two or three seconds. Basically, cleaning up between songs and getting rid of all those annoying pops where the recorder started and stopped. It's also been useful to bring up (or down) the level of a whole track, where one particular track got mixed quieter (or louder) than the other songs on the CD.